Have you ever forgotten if you fed the dog breakfast? Or maybe your dog is like mine and is always ready for another meal… Look no further!
Did you feed the dog?
Background
Calli the dog has always been motivated by one thing in life: food. In fact, it motivates her so much she has been know to ask for breakfast one human at a time. Like most dogs as soon as someone steps into the kitchen in the morning, Calli knows its time for breakfast. However, she also knows that after a delicious meal, there’s a chance for more. She waits patiently for the next person to make their way down to the kitchen, and you guessed it, “Breakfast Time!?!?!”, she exclaims. We needed another way to keep track of this, so I created a system to sort out this conundrum using Home Assistant, our phones, and some NFC Tags!

Getting Started
Before beginning this tutorial, please make sure you have the following:
- Home Assistant
- NFC Tags –> Purchase Here! (paid link)
Creating the Helpers
Helpers are used like environment variables and their state can be read or modified by an automation. Some examples include: Input Boolean, Input Datetime, Input Number, Input Select, Input Text and Counter. For detailed info, please review - Home Assistant Docs
Let’s start by opening up the menu to create helpers:
To create a helper, select Add helper at the bottom right of the page.
Helper 1 - Counter - Dog Meal Counter
The first helper that we create will be a counter. It will be used to keep track of the number of times that we fed our dog and will reset at midnight. It needs to have a maximum value of 2 (or more depending on Fido) and a step size of 1.

Helper 2 & 3 - Input Boolean - Dog Breakfast & Dog Dinner
The next two helpers that we need are toggles. They will be used to keep track of which meals our dog has ate. I have named one Dog Breakfast and the other Dog Dinner (how creative, ik!).

Setting up the Tag
To create a tag, open the configuration menu and select tags:
Next, click Add tag at the bottom right of the page.
Tag 1 - Counter - Dog Meal Counter

From your phone:
Go ahead and grab the tag that you plan on using, name it, and select create and write. Finally, to write the information to the tag, simply place your phone on top of it.
Creating the Automations
I am going to break up each automation into a set of triggers, conditions and actions.
- Trigger: Define what will set the rule off
- Condition: Define what needs to be in place in order for the action to complete
- Action: A list of things the rule will actually do
Let’s start by opening up the menu to create automations:
To create an automation, select Add automation at the bottom right of the page.
Automation 1 - Counter - Dog Meal Counter
GUI
(If you prefer to use YAML, skip to code)
Triggers
We will need to select the tag we setup in the previous step. Anytime this tag is scanned, it will kick off the automation.

Conditions
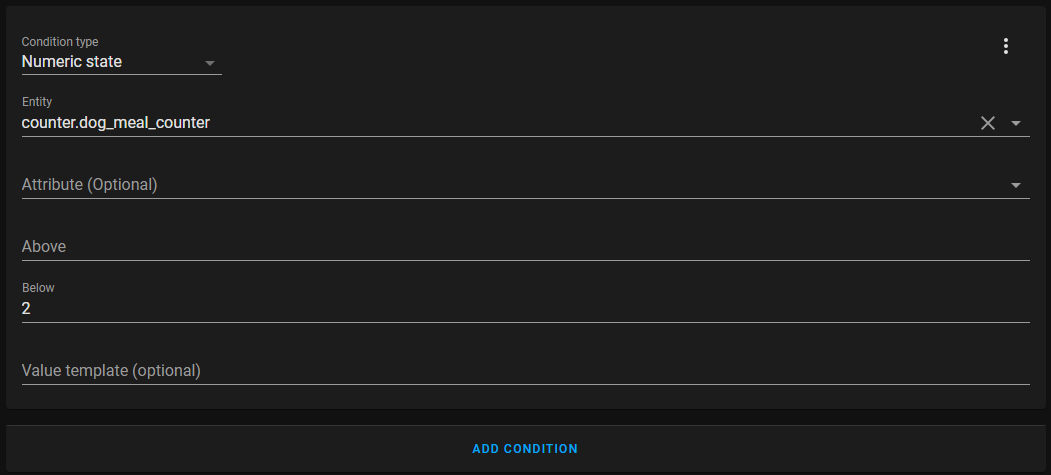
Since the dog only eats two meals, we will set a numeric state condition on our counter to below 2. This will prevent the automation from running if the dog has already eaten twice.

Actions
For the first action we want the automation to increment the counter (add one to it). This can be done with the call service action type and selecting the counter.increment service. Finally, we will want to make sure we target the meal counter.

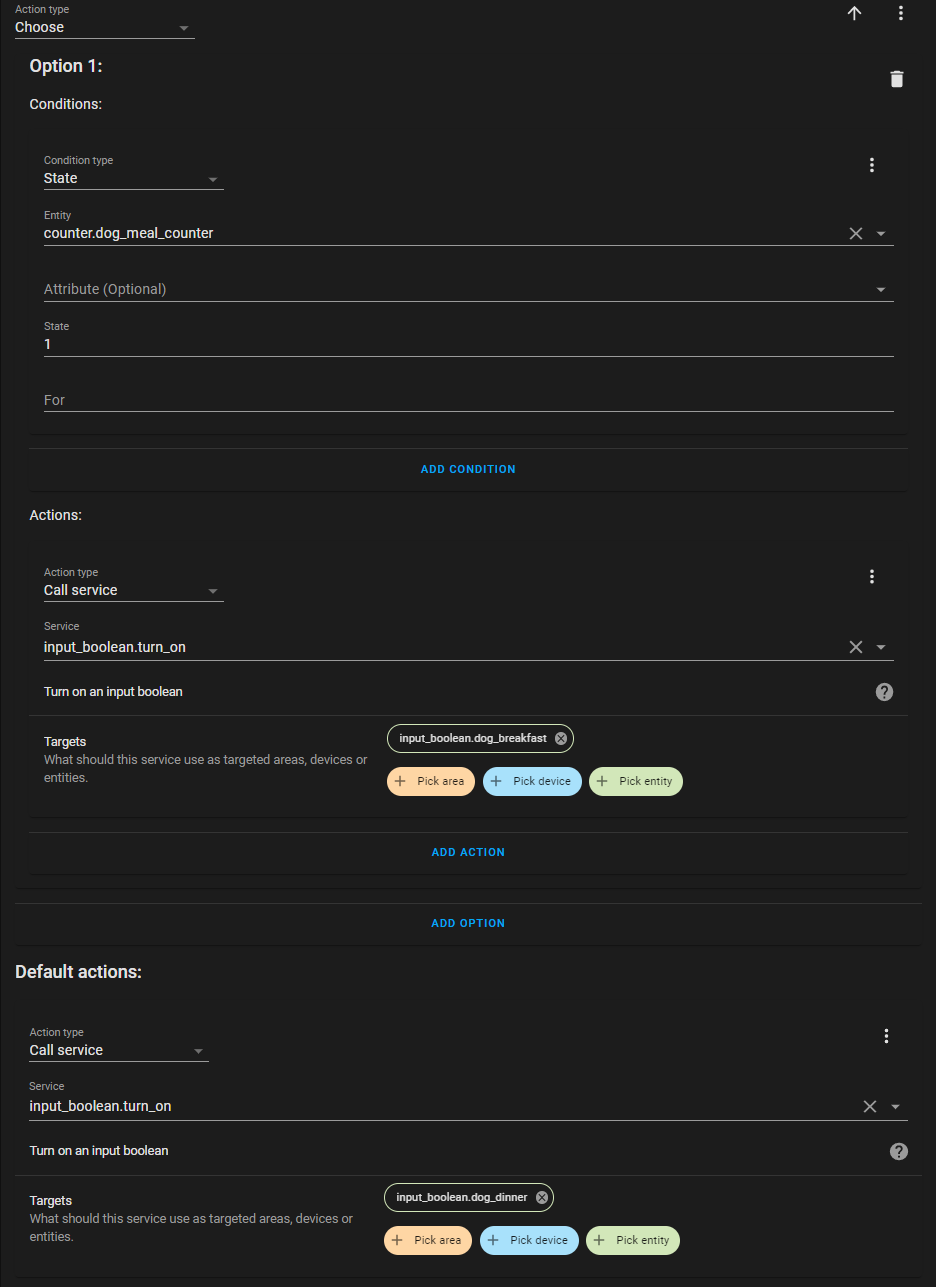
Next, we will use a choose action, which acts like a simple if/else statement. If the counter’s value is 1, turn on Dog Breakfast, otherwise (else) turn on Dog Dinner.

Code 1
Here’s the full code of what we just built:
Thats it! Now we can move onto the last automation.
Automation 2 - Counter - Dog Meal Counter Reset
GUI
(If you prefer to use YAML, skip to code)
Triggers
The trigger for this automation will be of the type time and will be set to 00:00:00. This means the automation will start everyday at midnight.

Conditions
We don’t need to set anything here!
Actions
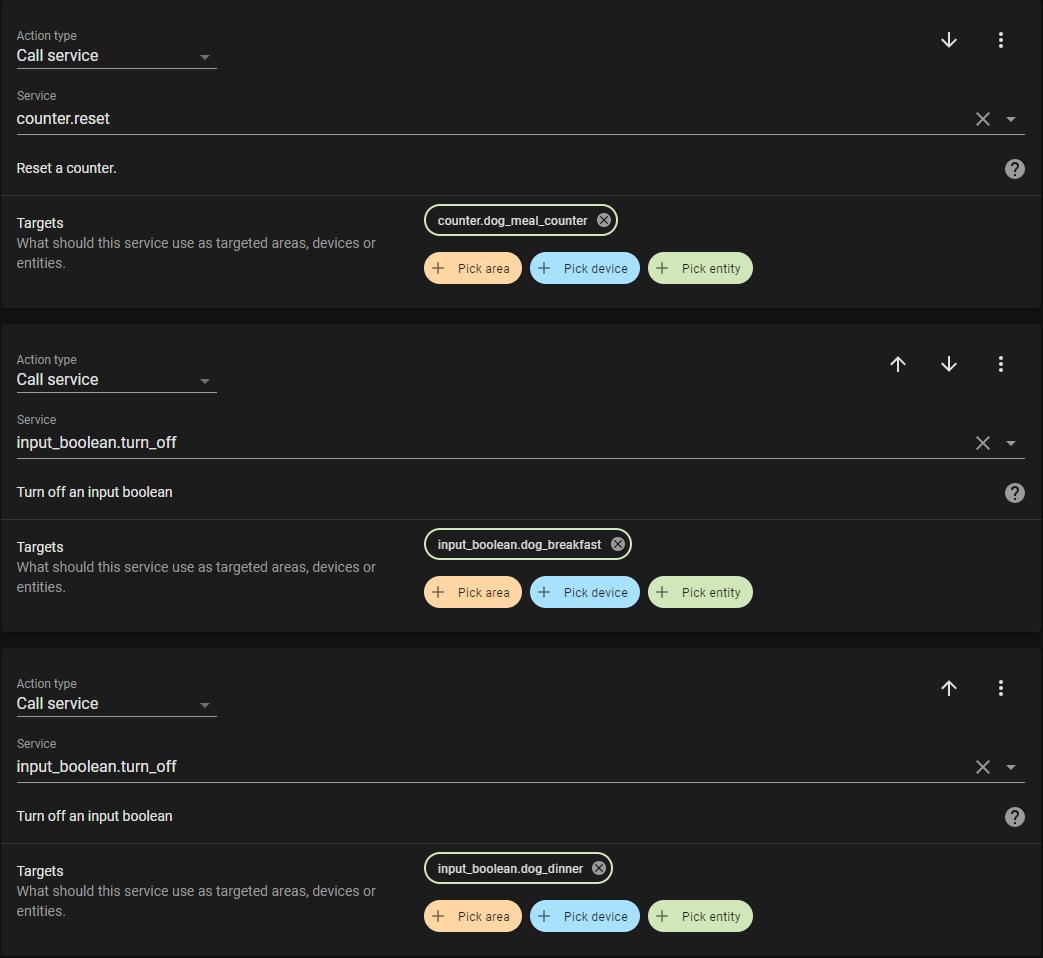
We will need to do three things:
- Reset the counter
- Turn off Dog Breakfast
- Turn off Dog Dinner
In order to reset the counter we will need to call the counter.reset service with the meal counter as the selected target. Finally, in order to turn off the meal switches, you will need to call the input_boolean.turn_off service targeted at each switch respectively.

Code 2
Voilà, we have working code!
Wrapping up
To finish this one off, I created a card on the dashboard so the info is always visible!


